
Radiasun is the leading manufacturer of cable and satellite meters in the world. Radiasun delivers the most satisfying products and services to the customers all over the world, with our own brands name, and also provides OEM and ODM for the most famous brands in the field.
| 1.How to upgrade the meter |
Install and run Philips Flash Utility Installation. Set as program.jpg Click “Read device ID 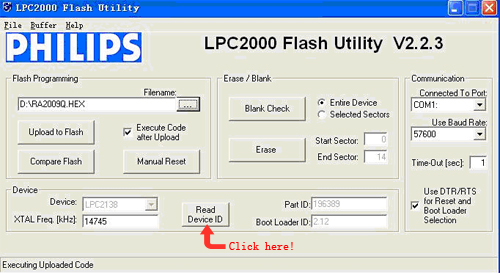
Click Erase In “Flash Programming” zone, select the path that ra2009C.hex locates Click “Upload to Flash” and wait until the programming finishes. Initializing the meter from the SETUP menu after upgrading. |
| 2.How to implement a test of spectrum analysis. |
 Using the LEFT/RIGHT key highlight the icon “SPECT” and press the CH/ENTER key, the meter enters spectrum measurement mode. Using keypad input center frequency and press MHz key, or input channel number and press CH/ENTER, the unit will show spectrum analysis. Press F1 to zoom in and press F2 to zoom out, the BW (bandwidth) toggles among 15MHz, 30MHz, 150MHz. Press LEFT/RIGHT key to move the cursor to see the tested signal strength. Press UP/DOWN arrow key to change the reference level by 5dB step Press F3 to save file. Press F4 to return to the main menu. |
| 3.How to implement an auto test. |
Using the LEFT/RIGHT key highlight the icon “AUTO” and press the CH/ENTER key, or press numeric “2” key, the meter enters Auto measurement mode. 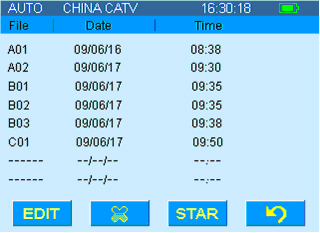
The unit will show the list of files in storage. Using UP/DOWN arrow key select an empty file and press F1 to create a new auto test file. Using keypad enter file name, using UP/DOWN arrow key move the cursor, using LEFT/RIGHT key select the channel number of No.1 to No.5 channels; Select “Save & Return” and press F3. Using UP/DOWN arrow key select an existing file and press F1 to edit the saved auto test file. Using UP/DOWN arrow key select an existing file and press F3 to implement the auto test. After the test is finished, press F3 to save the tested result. The saved file can be viewed in the “FILE MANAGEMENT” mode. 
|
| 4.Create an user channel plan |
Using LEFT/RIGHT key highlight the icon “SELECT USER PLAN” and press the CH/ENTER key, the meter enters the “SELECT USER PLAN” menu. Using UP/DOWN key select the user plan you want and press CH/ENTER to confirm. In the main SETUP menu, using the LEFT/RIGHT key highlight the icon “EDIT USER PLAN” and press the CH/ENTER key, the meter enters the “EDIT USER PLAN” menu. Using UP/DOWN arrow key highlight the channel and press F3 to enter the CHANNEL SETUP menu. Disable the checkbox of “Select” of the channel if you want to omit the channel in test. Select “Save & Return” after setting up. |
"Thank you for this great product I'm using it for 1 week and it is working like a charm.I am just trying to do the marketing here in my country and other nearby countries and will get back to you soon." Mauritius