
Radiasun is the leading manufacturer of cable and satellite meters in the world. Radiasun delivers the most satisfying products and services to the customers all over the world, with our own brands name, and also provides OEM and ODM for the most famous brands in the field.
RA6400R-OTDR
RA6400R - 15/16dB(40-50km) high dynamic range(1310nm/1550nm ± 20nm)
RA6400R - 30/32dB(100-110km) high dynamic range(1310nm/1550nm ± 20nm)
Operating
1. Fast auto measurement
While in this mode, the instrument can automatically set the optimum measurement conditions and get measurement results, operators don’t have to learn complex background knowledge and details of operating steps. In order to improve the accuracy of auto measurement, user can appropriately increase the averaging times for auto test, but this will prolong the time of auto test.
The steps are very simple. User only needs to first connect in optical fibre, then click 【AUTO】 button, then the instrument automatically set the optimum measurement conditions and give accurate measurement results. For example, user can choose this mode to measure waveform and event list.
2. Manual measurement
Manual measurement includes real-time measurement and average measurement. In manual measurement, user should first set measurement conditions before starting the measurement.
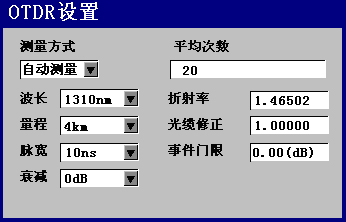
2.1 Set measurement conditions
The setting items include measurement mode, averaging times, wave length, measurement range, pulse width, refractive index, optical cable correction factor, etc.
To set measurement conditions, please first enter the measurement parameters configuration screen. Click【SETUP】 button while in main menu, then select the option 【Configurations】 to enter the measurement parameters configuration screen as shown in figure below
2.2 Start measurement
While in main menu, click 【START/STOP】 button. Click【START/STOP】 button while in main menu, the system will start measurement, and will display measurement curves and event list in 30s.
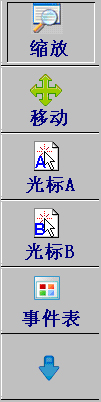
3. Waveform operations
After finishing the measurement of waveform, user can perform a series operations over the wave form, e.g.:
Zoom in/out waveform, move waveform, move cursor, operate event list
The direction keys will have different functions in different operation modes, for details see the table below:
Operation mode |
Up (↑) |
Down(↓) |
Left (←) |
Right (→) |
Zoom in/out |
Zoom in vertically |
Zoom out vertically |
Zoom out horizontally |
Zoom in horizontally |
Move |
Move upward |
Move downward |
Move leftward |
Move rightward |
Cursor |
Move a lattice leftward |
Move a lattice rightward |
Move a point leftward |
Move a point rightward |
Event list |
Previous event point |
Next event point |
Null |
Null |
3.1Zoom in/out waveform:
X-axis waveform zoom in/out is a zoom in/out action centralized on cursor A or cursor B that you selected.
Y-axis waveform zoom in/out is a zoom in/out action referring to mid-point of Y-axis.
First select the zoom in/out mode. To make zoom in/out mode be current mode, click the right function buttons (F0-F5) in the menu options called zoom in/out in the first-level menu, the moment the zoom-in option will turn into a concave button, while the icon of current mode appearing in main menu turns into the icon.
Then you can click directional buttons to zoom in/out the waveform horizontally.
3.2 Move waveform
Select move mode as current operation mode, then click directional buttons to move the waveform.
3.3 Move cursor
Select cursor mode as current operation mode, then click directional buttons to move the cursor leftward or right ward. While you move the cursor, the dB value of the waveform that current cursor maps to will appear in the screen.
3.4 Select event point
As long as you select an event point, the system will automatically move waveform, allow current event point to appear in the middle of waveform display area.
To select an event point, first select event list mode as current operation mode, then click upward or downward directional buttons to select different event points.
4. File operations
4.1Save
(1) Popup the menu, this step can be ignored if the menu already popup.
(2) Enter the second page of the menu, click “Save” option, a dialog box will popup indicating you to enter the file name.
(3) Enter file name, no null name is allowed. The system will always automatically add “1” to the last three numbers in the file name.
for example, if the name of the file you saved last time is xxx001, the file name displayed when you enter the file name input box will be xxx002. The moment, you can also click the options 【Plus 1】 or 【Minus 1】 to increase or decrease the last three numbers in the file name.
(4) If no error messages appear in the screen, it means you have successfully saved the file, and the system will automatically return to main menu.
4.2 Open
(1) While in main menu, click 【FILE】 button to enter the file management screen.
(2) Click 【↑】, 【↓】 buttons to select the file to be opened.
(3) Click the option 【OPEN】 or 【ENTER】 to open current files.
4.3 Close
There are two ways to close current files
First:
While in main menu, directly click 【CANCEL】 button, current file will be closed.
Second:
(1)While in main menu, click 【FILE】 button to file management screen.
(2)Click 【↑】, 【↓】 button once again to select the files to be closed.
(3)Click the option 【CLOSE】, current file will be closed.
After the file is closed, the system will return to main menu. No curves will appear in the curve display area, the system will return to “stop test” state.
4.4 Delete
(1) While in main menu, click 【FILE】 button to enter file management screen.
(2) Click 【↑】, 【↓】 buttons again to select the file to be deleted.
(3) Click the option 【DELETE】, the file you selected will be deleted.
4.5 CLEAR
(1) While in main menu, click 【FILE】 button to enter file management screen.
(2) Click the option 【CLEAR】, a dialog box will pop up asking you whether the clear the files. If yes, please click 【ENTER】, the system will clear all files; if no, please click 【CANCEL】, the system will cancel the clearing operation.
5. Upload data
You can store the measurement results in this machine, or upload them to PC using upper computer software. To do so, you can connect one end of USB cable to USB port of this instrument, connect the other end to USB port of PC, then run upper-computer software, and click Upload in the software, these data will be uploaded to PC.
6. Switch input method
Where you need switch input method, please click 【UP】 (not a directional button, it lies in the left bottom of panel), then you can switch the input methods between abc, ABC, 123, which represent lowercase English letters, capital letters and numbers respectively.
7. Switch language
(1) While in main menu, click 【SETUP】 to enter setting screen.
(2) Click the option 【INSTRUMENT SETTINGS】 to enter instrument setting screen.
(3) Click leftward or rightward directional buttons to select the option Language Setting.
(4) The moment click upward or downward directional buttons to set the language as English or Chinese.
8. VFL settings
(1) While in main menu, click functional buttons, a menu will popup.
(2) Pagedown the menu, click the option 【VFL】, VFL setting screen will popup.
(3) Click upward or downward directional buttons to select VFL modes, i.e.: ON, OFF, 1HZ flash.
(4) Click 【ENTER】, the settings will take effect and the system will return to main menu, click 【CANCEL】 to cancel the settings.
9. Setting of timer power-off
(1) While in main menu, click 【SETUP】 to enter setting screen.
(2)Click the option 【INSTRUMENT SETTINGS】 to enter instrument setting screen.
(3) Click leftward or rightward directional buttons to select the option Timer Power-off.
(4) The moment click upward or downward directional buttons to set the time after which the instrument will be powered off. The time can be set as 10m, 30m, 60m.
"Thank you for this great product I'm using it for 1 week and it is working like a charm.I am just trying to do the marketing here in my country and other nearby countries and will get back to you soon." Mauritius