
Radiasun is the leading manufacturer of cable and satellite meters in the world. Radiasun delivers the most satisfying products and services to the customers all over the world, with our own brands name, and also provides OEM and ODM for the most famous brands in the field.
AV6471 Fusion Splicer
AV6471 - Fusion Splicer;
1.Brief introduction of Structure-Fusion splicer
The portable fusion splicer which was specially designed is suitable for field, lab and other situations. The Jig and Fixture is as Figure 5-1.
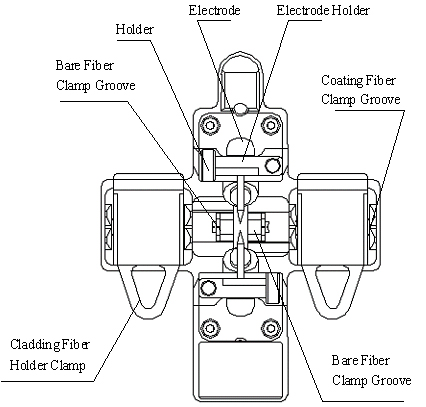
Figure 5-1
2. Introduction to Panel-Fusion splicer
2.1 Shield
The shield is closed unless fibers are going to be put in. Close it before any keyboard operation. With a viewfinder mirror and a holding clamp for bare fiber in the V-groove, it can prevent dust and wind and provide vertical light for the microscope.
2.2 Screen
The viewing angle of the 5.7-inch TFT-LCD can be adjusted. But please protect its screen from hard sharp things!
2.3 Power Supply
To provide convenience for user, the inner Li-Ion battery and direct current was applied. The direct current was supplied by the adapter, and the battery was charged when the adapter was used.
2.4 Charging Indicator Light
When the adapter was plugged in, the red indicator LED was turned on. The green led will shine after charging was accomplished.
3. Introduction to Keyboard-Fusion splicer
The layout of the keyboard as figure 5-2. There are two kinds of key operation, i.e. Menu and Fusion![]() . ,
. , ![]() and
and![]() are effective in any mode, the function are listed in table 5-1. Under Menu and Splice mode, the function of key are listed in table 5-2, table 5-3.
are effective in any mode, the function are listed in table 5-1. Under Menu and Splice mode, the function of key are listed in table 5-2, table 5-3.


Figure 5-2
Key |
Function Description |
|
This key is power, when it was pressed for about 0.5 second; the instrument would turn on or turned off. |
|
Press to operate the reinforcement heater. |
|
All operations except heating would be canceled, if this key was pressed, and all the motional parts will be move to default position, and the instrument is ready for next fusion. |


Key |
Function Description |
|
Exit the current menu and return to the upper level or to the splicing interface (if in the main menu currently). |
|
Press to enter the next sub-level menu;used to switch between the right and left fibers when adjusting motor, In the test menu, it confirms the start of a test. |
|
Move the cursor up or increase a parameter. In motor test menu, used to move the fiber up. |
|
Move the cursor down or reduce a parameter. In motor test menu, used to move the fiber down. |
|
If the menu was pressed in menu, the parameter value would be decreased, or the screen will be changed. |
|
If the key was pressed in menu, the parameter value would be increased. |


Key |
Function Description |
|
Press this key; the splicer accomplishes cleaning, gap adjustment, alignment, fusion splicing and loss estimating functions. The results will be displayed automatically on the screen. |
|
Press this key and the splicer will discharge for a short time between the two electrodes. This operation can get rid of the dust on the fiber but not of the stabs on the fiber NZDS. |
|
Press this key and one round of fusion splice will be done. The estimated loss will be displayed on the screen. Do not press this key without fiber, except for cleaning the electrodes. During discharge there is thousand NZDS of voltage between the electrodes. So for safety, don’t touch them. |
|
Press this key and the splicer will adjust the fiber to an appropriate position and clean it for fusion. When the operation is done, the buzzer beeps and the screen display "OK". |
|
Press this key, alignment will be done. When alignment is done, the buzzer beeps and the screen display "OK". |
|
Press this key to enter the main menu. |


4. Introduction to Port board-Fusion splicer
Input/Output port is on the right side of the main body, as figure 5-3, the function are introduced in table 5-4.

Figure 5-3
Name |
Function Description |
POWER IN |
DC power input terminal,14.5V,45A. |
CHARGE |
When the lamp is red, the battery is charging. When the lamp is off, the battery is full. |
USB |
Used to upgrading software and exporting record data. |
VGA |
Video signal output. |
5. Introduction to Standby Interface-Fusion splicer
The standby interface and introduction of this OFFS is shown in figure 2-2. And the standby interface can be switched to the mode shown in figure 2-3 with the key . The image of fibers, current fusion programme, battery capacity, the inner temperature, inner humidity, the date and time are displayed on the screen.
"Thank you for this great product I'm using it for 1 week and it is working like a charm.I am just trying to do the marketing here in my country and other nearby countries and will get back to you soon." Mauritius